Business WordPress Theme

  • Created : 1st August 2017
  • Author by : Stronghold Themes
  • Support via Email : strongholdthemes@gmail.com
  • Thank you for purchasing this theme. If you have any questions that are beyond the scope of this help file, please feel free to contact us. Thank you very much!

WordPress Information #back to top

Before you can install and use this theme, you will need to setup and install WordPress on your server. The links below can provide useful information on setting up WordPress as well as some general information on the WordPress platform.

FinanceLife Requirements #back to top

Before you begin installing the theme, you should make sure that the PHP configuration limits of your hosting meet the minimum requirements outlined below. Although the theme may still install in some cases, if you run into any trouble while importing demo content it maybe because of your PHP configuration limits.

  • upload_max_filesize 32M
  • post_max_size 32M
  • max_execution_time 90
  • memory_limit 128M

FTP Theme Installation #back to top

  1. Unzip the financier.zip file to get the FinanceLife theme folder
  2. Use your ftp client to navigate to the themes folder. To do this click the (wp-content) folder then click the themes folder.
  3. Upload the financier folder to the themes folder
  4. Login to the WordPress admin dashboard.
  5. Click Appearance => Themes.
  6. Click the Activate button by the FinanceLife theme.

WordPress Dashboard Installation #back to top

  1. Login
  2. Click Appearance => Themes => Add New

  3. Click Upload Theme

  4. Click Choose File then navigate to where the theme is downloaded and choose financier.zip to upload it.
  5. Next click Install Now to begin the installation process.

  6. When the installation is finished click Activate to complete the process.

Required Plugin Installation #back to top

After installing the theme you will be presented with a message indicating that the theme requires some plugins. You should install these plugins for optimal usage of the theme.

  1. To install these plugin, first click Begin installing plugins.

  2. Click the checkbox next to each plugin you want to install then choose Install from the dropdown and click Apply.

  3. All required plugins should now be installed and activated.

How to Update Theme #back to top

The theme can be updated using one of the methods mentioned below.

  1. FTP Theme Upgrade
  2. Dashboard Theme Upgrade
  3. Envato Market Plugin

FTP Theme Upgrade

The process of updating the theme via FTP will be the same as the FTP upload installation, so you can repeat those steps to update the theme.

When working with WordPress your content (pages, posts, menus and custom post type posts) and custom theme option styles and settings are stored in the database not the theme files. This means that deleting the theme folder then re uploading it will not delete your content.

Dashboard Theme Upgrade

You can follow the steps below to update the theme using your dashboard.

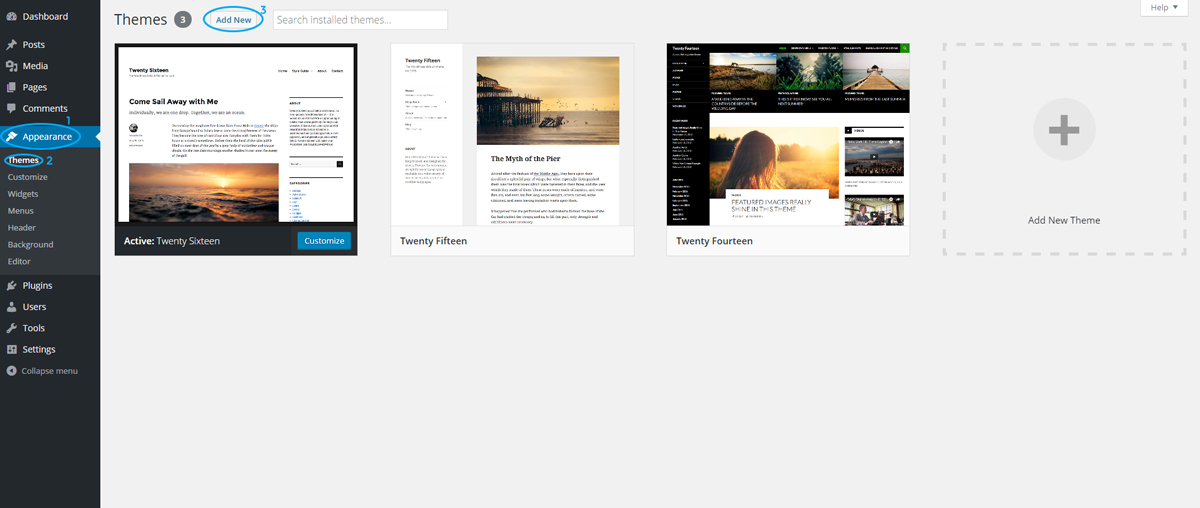
  1. Appearance => Themes. Activate Twenty Sixteen theme. (You can't delete a theme while it is active)
  2. Click the FinanceLife theme to view theme details. In the bottom right click Delete to delete the old version of the theme.
  3. After deleting the theme, click Add New, to the top of the themes page.
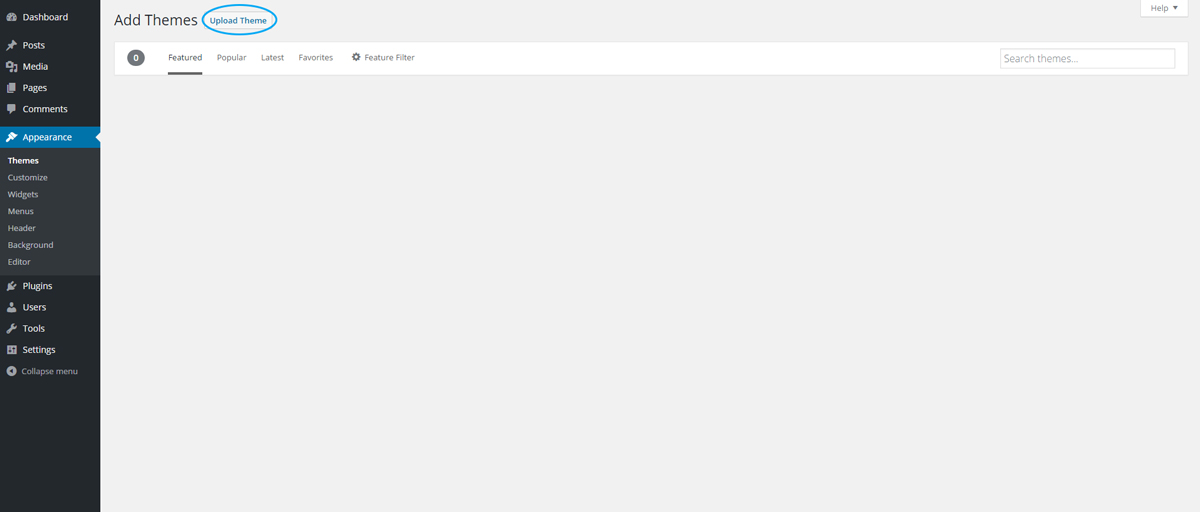
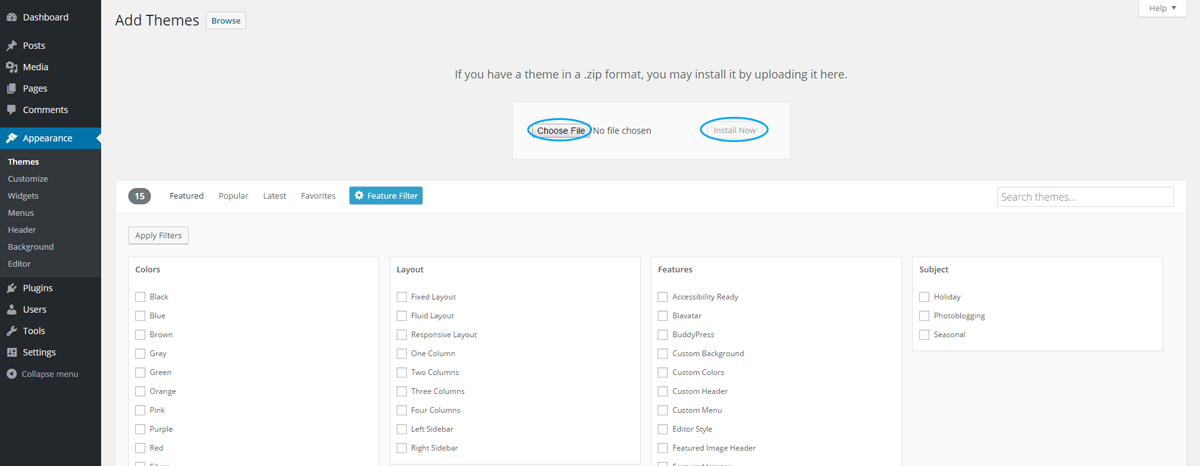
  4. Next click Upload Theme then click Choose File to select the theme zip folder. Then click Install Now.
  5. After it is finished installing click Activate to finish.
  6. You can also repeat these steps to add the included child theme.

When working with WordPress your content (pages, posts, menus and custom post type posts) and custom theme option styles and settings are stored in the database not the theme files. This means that deleting the theme folder then re uploading it will not delete your content.

Envato Market Plugin

To update the theme using the Envato market plug-in you first need to make sure you have it installed and activated.

  1. From the WordPress dashboard click Envato Market.
  2. Next click generate a personal token to create an Envato API personal token.
  3. On the next screen use your Themeforest login information to sign in. Then enter a token name and click Create Token.
  4. Paste the generated token in Token field in the Envato market plug-in and click Save Changes.
  5. With this plug-in setup you will receive theme updates automatically in your dashboard.

Demo Importation #back to top

You can follow the steps below to import demo data.

  1. Go to Appearance => FinanceLife Demo Data Import
  2. Next click Import then Yes, import.

How to set-up a Mega Menu #back to top

This theme comes with a built-in mega menu. You will need to set up your correctly for it work. Below shows an example of how to set up a 3 column mega menu.

  1. You first need to define how many columns will be displayed in the mega menu. This is applied to top level menu item only.
  2. Set each new column to the same level.
  3. The number of columns created should match the column value chosen for the mega menu to prevent overflows.
  4. If you wish to add an image to the mega menu, you can use the textarea to add image HTML markup to a column. Or you could install the Menu Image plugin to add the image.

Where is my license? #back to top

When you purchase any theme from themeforest that has premium plugins like WPBakery Page Builder, Revolution Slider etc bundled with it, those plugins are included with an Extended License that allows theme developers to distribute them with the theme. Because of this there is no individual license for each buyer of the theme to enter, you just use the plugin as is. Those messages are for persons who purchased the plugin directly from the plugin author with a Standard License. Plugin updates will be included in theme updates and support will be provided by me.

Revolution Slider Data Import #back to top

  1. From the WordPress dashboard, click Revolution Slider.
  2. Next click Import Slider.

  3. You will be presented with a screen similar to the one below. Click Choose File then navigate to the Revolution Slider file in the Sample Data folder.
  4. After choosing the slider file click Import Slider then wait until the import is finished.

  5. If you wish to add the slider to the header of a page. Go to the Page Options of the page. Make sure Header Revolution Slider is set to ON then choose the slider.

Enable WPBakery Page Builder for additional post types #back to top

  1. From the WordPress dashboard, click WPBakery Page Builder. => Role Manager.
  2. Choose Custom from the Post types dropdown.
  3. Select the post types you wish to use with WPBakery Page Builder by clicking the checkbox. Click Save Changes to finish.

Theme Options #back to top

The Theme Options panel in this theme is built using the WordPress Customizer and it can be found by going to Appearance => Customize.

From there you will find the relevant theme options divided into the following sections:

  1. General
  2. Header
  3. Styling
  4. Contacts & Social
  5. Shop
  6. Footer
  7. Blog
  8. 404
  9. Typography

General #back to top

In the General section of the theme options, you can make changes to the site such as:

  • Change the copyright text found in the footer
  • Change the site default site layout
  • Change the site layout style
  • Turn On/Off the back to top button

Styling #back to top

The Styling section is divided into 3 sub-sections:

  1. General Styling
  2. Header Styling
  3. Footer Styling

In the General Styling section you can:

  • Change the site Primary Color
  • Change the site Secondary Color
  • Change the site Background Color
  • Change the site Background Image
  • Add custom CSS to the site

In the Header Styling section you can:

  • Change the Top Header Background Color
  • Change the Top Header Text Color
  • Change the Top Header Icon Color
  • Change the Main Navigation Links Color
  • Change the Main Navigation Dropdown Links Color
  • Change the Main Navigation Background Color
  • Change the Header Area Background Color
  • Change the Header Contact Icons Color
  • Change the Header Contact Description Color
  • Change the Header Contact Title Color
  • Change the Mega Menu Background Color
  • Change the Mega Menu Background Image
  • Change the Sticky Header Links Color
  • Change the Sticky Header Dropdown Links Color
  • Change the Sticky Header Background Color

In the Footer Styling section you can:

  • Change the Footer Widget Area Background Color
  • Change the Footer Widget Area Background Image
  • Change the Footer Widget Area Text Color
  • Change the Bottom Footer Text Color
  • Change Bottom Footer Background Color

Contacts & Social #back to top

The Contacts & Social section is divided into 4 sub-sections:

  1. Contact Information
  2. Social Networks
  3. Social Links
  4. Google Maps

In the Contact Information section you can:

  • Change the call us text and icon
  • Change the address text and icon
  • Change the opening hours text and icon
  • Change the quote title and page

In the Social Networks section you can:

  • Enable and Disable required social networks

In the Social Links section you can:

  • Add social links
  • Add custom social icons

In the Google Maps section you can:

  • Add your Google Maps API

In the Shop section you can:

  • Turn On and Off the shop page header
  • Change the shop page caption
  • Change the shop page title alignment
  • Change the shop page header image
  • Change the shop page breadcrumb
  • Change the shop page layout
  • Change the single product layout
  • Change the number of products on the shop page
  • Change the number of items per row
  • Turn On and Off Catalog mode
  • Turn On and Off the cart icon in the main menu
  • Turn On and Off the cart icon in the mobile main menu
  • Turn On and Off the products share bar

In the Blog section you can:

  • Turn On and Off featured images on single posts
  • Turn On and Off the read more button
  • Turn On and Off single posts navigation
  • Turn On and Off post meta info
  • Turn On and Off the share bar
  • Turn On and Off related posts and edit related posts title
  • Turn On and Off the author box below posts

In the 404 section you can:

  • Change the 404 page title
  • Change the 404 page text

Typography #back to top

This section is available when you install the Easy Google Fonts plugin. https://wordpress.org/plugins/easy-google-fonts/

How to set a Homepage #back to top

  1. From the Dashboard go to Appearance=>Customize
  2. Next click Static Front Page
  3. For the Front page displays option select A static page then select the page from the Front page dropdown.

How to create a one page layout #back to top

  1. You will need to create the page for the one page site. Go to Pages => Add New to do this.
  2. You will need to use WPBakery Page Builder Row IDs to create the sections for the one page site. To do this add a new row then edit the row to access the Row settings.
  3. Scroll down to the Row ID field and enter an unique id to identify the row.

  4. Repeat for each row of content ensuring each row has a unique id. Then click Publish to create the page.
  5. After creating the page you will need to create the navigation menu with links to each row. Go to Appearance => Menus and click the create a menu link to name and create the menu.
  6. With the menu created go to the Custom Links section to create the navigation links. In the URL field for each link, enter the Row ID used when creating each row with # preceding the Row ID. Also enter a title for the link in the Link Text field.
  7. After creating each menu item click the checkbox next to Main Menu then click Save Menu.

How to add a team member #back to top

  1. From the WordPress dashboard, click Team Members.
  2. Next Click Add New.
  3. You will be presented with a screen similar to the one below.

  4. Click Set Featured image to set an image for the team member and enter any relevant details or options for the team member.
  5. When finished click Publish to create the team member
  6. Next you will need to create a page to view the team member. To do this click Pages => Add New to create a new page.
  7. Give the page a name and use WPBakery Page Builder to add the Team Members widget to the page.

  8. When finished click Publish to create the page.

Using Poedit to translate the theme #back to top

  1. Visit http://poedit.net/download to download a copy of Poedit for your system and install it.
  2. Run Poedit and click Create new translation.

  3. Navigate to the download package and go to financier/languages. Click on either the default.po or default.pot file.
  4. Choose the language you wish to translate the theme to.

  5. Click on each row of text to highlight the untranslated text and enter the translated text in the Translation field.

  6. When you have finished translating the required text click Save to save the file, this will create a .po and .mo file. It is important that the name you give the file is the same as the WordPress Locale for your language. For example for French the WordPress Locale is fr_FR, for Spanish it is es_ES. For a full list of these locale names visit http://wpcentral.io/internationalization/.
  7. With the files saved you need to navigate to the theme’s languages folder on your server. Its address should be wp-content/themes/financier/languages. Add both the saved .po and .mo files to this directory.
  8. Go to your WordPress dashboard then click Settings -> General. Scroll down to Site Language. From the list choose the language you wish to translate the site to.

  9. Click Save Changes to Finish.

Using Loco Translate to translate the theme #back to top

  1. To use Loco translate to translate your theme, you first need to install it. To do this click Plugins then Add New.
  2. Next search for Loco Translate then install and activate it.
  3. After Loco translate is installed and activated click Loco translate from the dashboard then click FinanceLife.

  4. Next click the New language link.
  5. Select your language from the dropdown then click Start translating

  6. Click the strings of text in the Source Text field you wish to translate and enter the translated version in the field provided.
  7. Repeat this for all the strings then click Save to finish.

Images Used#back to top